
Uploading 360-degree photos to Facebook is a powerful way to share immersive experiences, but metadata errors often cause these images to display as flat panoramas. This guide provides a complete, step-by-step process for successfully uploading 360 photos to Facebook, troubleshooting unrecognized formats by fixing EXIF data, and optimizing your files for the highest possible quality using professional web-based tools.
How to Upload 360° Photos to Facebook
To upload a 360° photo to Facebook, simply log in, click the Photo/Video button, and select your file. If the image contains the correct metadata, Facebook will automatically recognize it, displaying a spherical globe icon on the preview before you hit the Post button.
In our work developing professional Virtual Tour Software, we frequently guide users through this exact process to ensure their virtual assets display perfectly on social media. Here is the standard step-by-step procedure:
Step 1: Log in to facebook.com on your desktop or open the Facebook app on your phone.
Step 2: Click the “Photo/Video” button to create a new post, and select the 360° photo you wish to upload from your device.
 1")
After the photo is uploaded to the draft, look at the bottom right corner of the image preview. You will see a 360° globe icon, confirming Facebook recognizes the format.
 2")
Step 3: Click the blue “Post” button to publish your immersive photo to your feed.
You can view a successful 360° photo result on Facebook at this link: https://www.facebook.com/photo/?fbid=1443262250922315
Why Does Facebook Not Recognize 360° Photos?
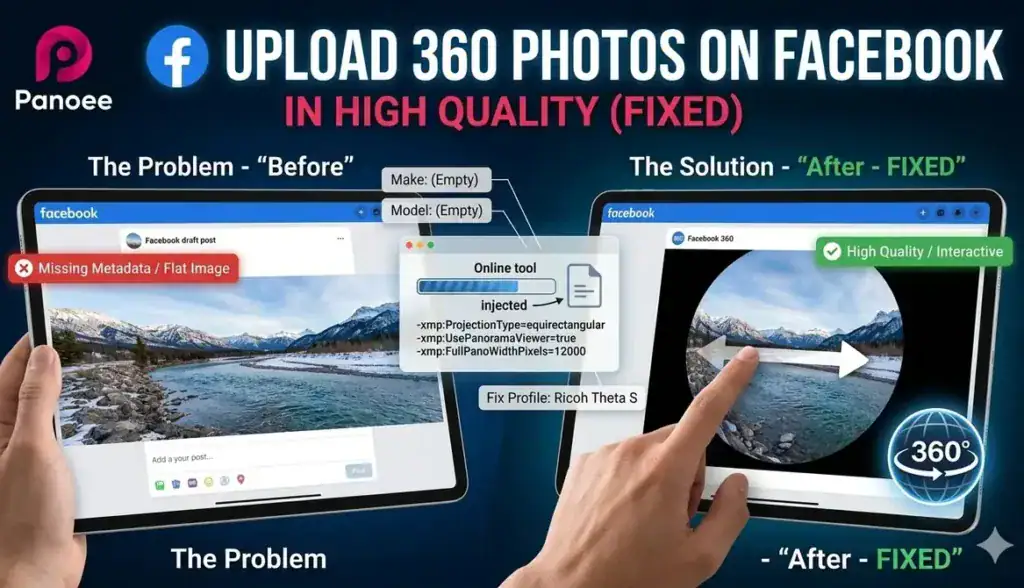
Facebook fails to recognize 360° photos primarily due to missing EXIF metadata or incorrect aspect ratios. The platform relies on specific embedded tags – most notably ProjectionType=equirectangular – and a strict 2:1 aspect ratio to trigger the interactive 360 viewer rather than displaying a standard, flat image.
When we process thousands of panoramic images for real estate and tourism projects, we find that editing a 360 photo in software like Photoshop or Lightroom often strips the original camera metadata. Without this EXIF data, Facebook is “blind” to the fact that the image is a sphere.
Additionally, the image must maintain a perfect 2:1 Aspect Ratio (the width must be exactly twice the height). For example, resolutions like 4000x2000px or 6000x3000px work perfectly. If you crop even a single pixel off the top or bottom, Facebook will reject the 360 format and post it flat.
Fixing Metadata (If It Posts as Flat)
If your panorama posts as a flat image, you must inject the correct XMP metadata using an EXIF editor. By processing your file through tools like Exif Fixer, you embed the required spatial data that forces Facebook to activate its 360-degree viewer.
Option 1: The Quick Windows Fix
Before using external tools, Windows users can right-click the image, select Properties > Details, and manually change the “Camera maker” to Ricoh and “Camera model” to Ricoh Theta S. This often tricks Facebook into recognizing the format.
Option 2: Using Exif Fixer Online (Recommended)
For a guaranteed fix, use a dedicated metadata tool:
 3")
- Access the online tool at https://exiffixer.com/online.htm.
- Upload the 360-degree photo you want to edit.
- Select the output format as Panorama/360.
- The tool will inject the missing data and provide a new file for download.
Here is a breakdown of the exact metadata Exif Fixer adds to your image to ensure Facebook compatibility:
| Metadata Tag | Value Injected | Purpose |
-xmp:ProjectionType | equirectangular | Defines the spherical mapping |
-xmp:CroppedAreaLeftPixels | 0 | Confirms no horizontal cropping |
-xmp:CroppedAreaTopPixels | 0 | Confirms no vertical cropping |
-xmp:CroppedAreaImageWidthPixels | 12000 (Matches image width) | Sets the viewing width |
-xmp:CroppedAreaImageHeightPixels | 6000 (Matches image height) | Sets the viewing height |
-xmp:FullPanoWidthPixels | 12000 | Declares total spherical width |
-xmp:FullPanoHeightPixels | 6000 | Declares total spherical height |
-xmp:UsePanoramaViewer | true | Forces the platform viewer |
You can then use this newly edited photo to upload directly to Facebook without any issues.
Pro Tip: Preview and Optimize Your Panoramas First
Before uploading, it is crucial to test your images to ensure they display correctly without distortion. Using dedicated, free online tools allows you to preview the immersive experience and compress the file size without sacrificing visual quality.
To save time and ensure perfection, we recommend using free, independent web-based utilities. You can instantly test your spatial alignment using a 360 Panorama Viewer. If your file is too large for social media (which can result in harsh, automated compression from Facebook), run it through a 360 Panorama Optimization tool. This reduces the file size while maintaining the crisp, high-resolution details your audience expects.
- How to Embed Interactive 360 Panoramas on Your Website
- How to Upload 360 Photos to Google Maps
- The Ultimate Guide to Viewing 360 Panoramas Online
A Better Alternative for Storing and Sharing
While Facebook is great for social sharing, it heavily compresses images and lacks professional presentation features. For uncompromised quality, dedicated platforms offer unlimited storage and high-resolution playback tailored specifically for immersive media creators and professionals.
If you are frustrated by social media compression, we highly suggest exploring Panoee.live. It is a rapidly growing 360-degree photo community and a dedicated 360 photo hosting service. Unlike Facebook, it provides high-quality, unlimited storage that respects your original resolution, offering a far superior method for storing, viewing, and sharing your immersive masterpieces with clients or the public.
Frequently Asked Questions (FAQ)
Why does my 360 photo look blurry on Facebook?
Facebook automatically compresses large image files to save bandwidth, which can severely degrade the quality of 360 panoramas. To minimize this, optimize your image size before uploading and ensure you are uploading over a strong Wi-Fi connection, as mobile apps often reduce upload quality on cellular data.
Can I upload a 360 photo from my iPhone or Android?
Yes. You can upload 360 photos directly from the Facebook mobile app. Simply select the panoramic photo from your camera roll. If you captured it using the native panoramic mode on a modern smartphone, Facebook usually recognizes the EXIF data automatically.
Does Facebook support 3D 360 photos?
Facebook supports standard equirectangular 360 photos. However, true 3D 360 (stereoscopic) photos are generally better suited for dedicated VR headsets or specialized virtual tour software, as standard social media feeds are not optimized for stereoscopic depth.
How do I make my 360 photo the cover photo on my Facebook Page?
Go to your Facebook Page, click “Edit” on your cover photo, and choose “Select Photo.” Choose an uploaded 360 photo. Facebook will allow you to drag the image to set the initial starting view before you save your changes.
