Why This Camera & Lens Are Great for Panoramas
The Sony a7R V and the Canon RF 14–35mm f/4L IS USM each excel for panoramic and 360 photo work: the a7R V brings a 61MP full-frame BSI sensor with approximately 3.76µm pixel pitch, 14-bit RAW, and about 15 stops of dynamic range at base ISO—perfect for pulling detail in both shadows and highlights. The Canon RF 14–35mm f/4L is a professional rectilinear ultra‑wide zoom with excellent center sharpness, modern coatings, and minimal focus breathing, making it very capable for multi‑row, high‑resolution panos.
Important mount note: the Canon RF 14–35mm cannot be adapted to Sony E-mount bodies (such as the a7R V) in a practical way due to flange distance and electronic protocol differences. There is no mainstream RF-to-E adapter that preserves proper infinity focus and lens controls. If your goal is strictly to use this exact lens, pair it with a Canon RF body (e.g., EOS R5/R6). If you proceed with the Sony a7R V, use an equivalent native or easily adaptable rectilinear ultra-wide, such as the Sony FE 12–24mm f/4 G, FE 16–35mm f/4 G PZ, or an EF 16–35mm f/4L via EF–E adapter. For the workflow below, we describe settings and shot strategies that apply to the a7R V with a rectilinear ultra‑wide set to 14–20mm, which closely mirrors the RF 14–35mm’s field of view and panoramic behavior.
Rectilinear vs. fisheye: This guide assumes rectilinear capture (clean straight lines that stitch well for architecture). Rectilinear lenses need more shots than fisheyes, but avoid the heavy distortion typical of circular fisheyes—ideal for real estate, landscapes, and urban scenes.

Quick Setup Overview
- Camera: Sony a7R V — Full-frame 61MP BSI sensor, approx. 3.76µm pixel pitch, ~15 stops DR at base ISO, 14-bit RAW, superb color depth and detail.
- Lens: Canon RF 14–35mm f/4L IS USM — Rectilinear ultra‑wide zoom, very sharp center at f/5.6–f/8, some barrel distortion and vignetting at 14mm (correctable). Note: not mount-compatible with Sony E; use a native Sony FE ultra‑wide for the same technique.
- Estimated shots & overlap (full-frame rectilinear):
- At 14mm: Multi‑row, 3 rows of 8 (±45° and 0°) + zenith + nadir ≈ 26 shots (30–35% overlap).
- At ~16–20mm: 3 rows of 10 + zenith + nadir ≈ 32 shots (30–35% overlap).
- Single‑row speed run at 14mm (not full 360): 12–16 around for a cylindrical pano with 25–30% overlap.
- Difficulty: Intermediate — easy with a calibrated panoramic head; more challenging handheld or in crowds.
Planning & On-Site Preparation
Evaluate Shooting Environment
Scout your location for light direction, reflective surfaces (glass, polished stone), and moving elements (people, traffic, foliage in wind). For interiors with windows, expect a large dynamic range; plan to bracket exposures. If shooting through glass, place the front element close to the surface (within 2–3 cm) to reduce reflections and ghosting, and shield with a black cloth when possible.
Match Gear to Scene Goals
The a7R V’s high resolution provides generous headroom for reframing and precise control points in stitching. Its ISO performance is excellent up to ISO 800–1600 for pano work, especially when you’re on a tripod and can favor longer shutter speeds. A rectilinear 14–20mm field of view is ideal for architecture and real estate: straight lines stay straight, and detail is consistent frame‑to‑frame. Fisheyes require fewer shots but can alter straight lines, which is less desirable for many professional uses.
For a deep dive on preparing a DSLR/mirrorless workflow for 360 outputs, see Meta’s guide to shooting and stitching 360 photos with interchangeable‑lens cameras. Using a DSLR or mirrorless to shoot and stitch a 360 photo
Pre-shoot Checklist
- Charge batteries to 100% and bring spares; large pano brackets drain power.
- Format fast UHS-II or CFexpress cards; 61MP RAW files add up quickly.
- Clean lens and sensor; dust becomes far more noticeable in sky/flat areas when stitched.
- Level tripod; verify panoramic head calibration for this focal length.
- Safety: add a tether on rooftops or windy locations; mind overhead lines if using a pole.
- Backup workflow: shoot an extra full round (or at least a duplicate of the most complex row) as safety coverage.
Essential Gear & Setup
Core Gear
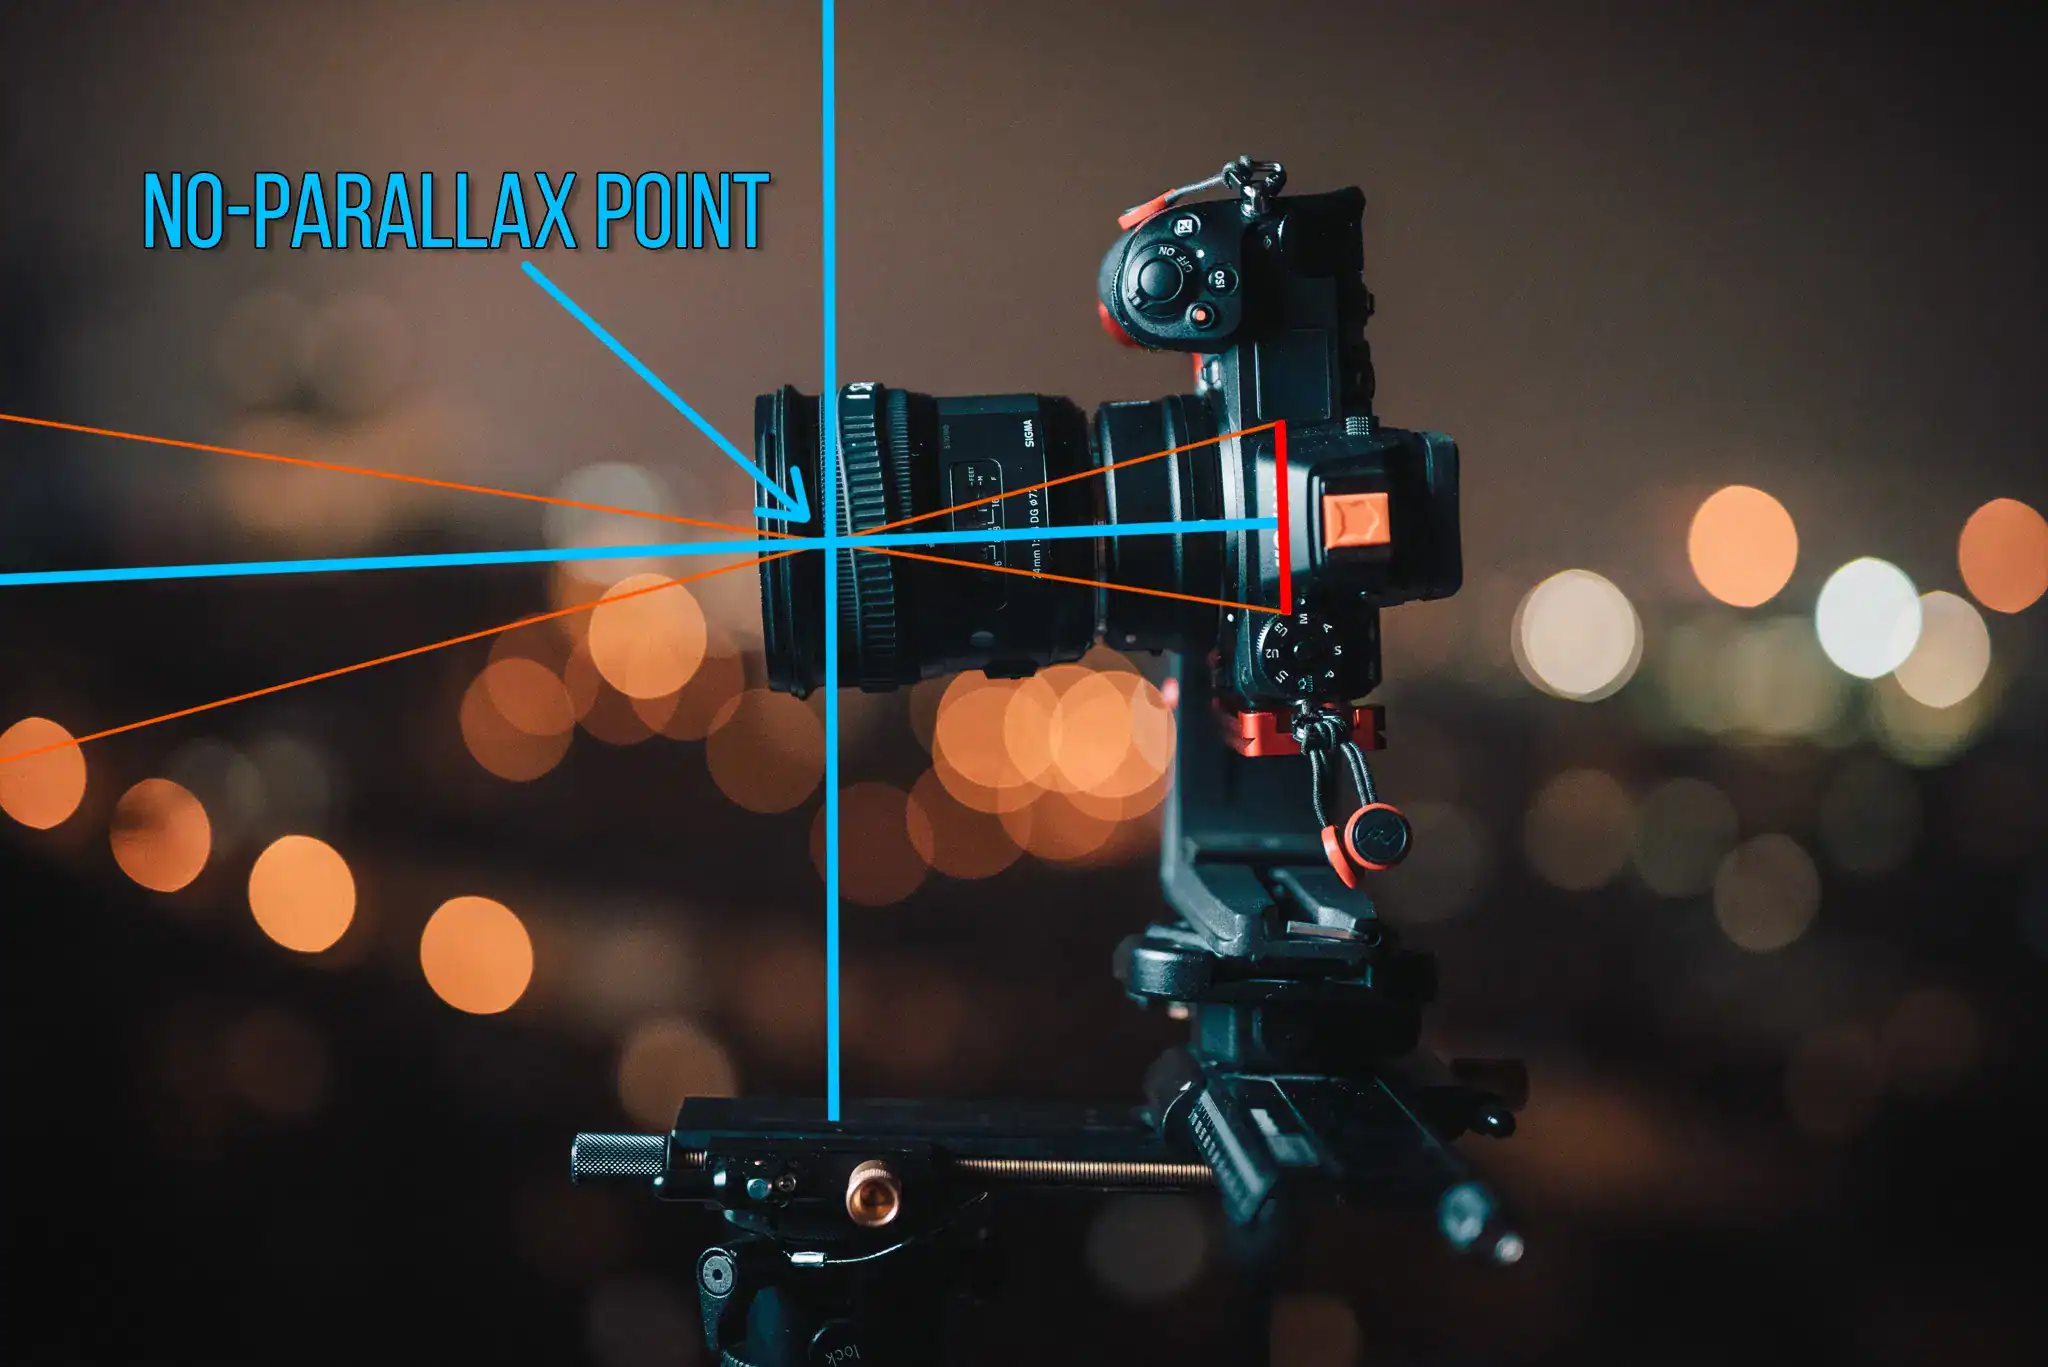
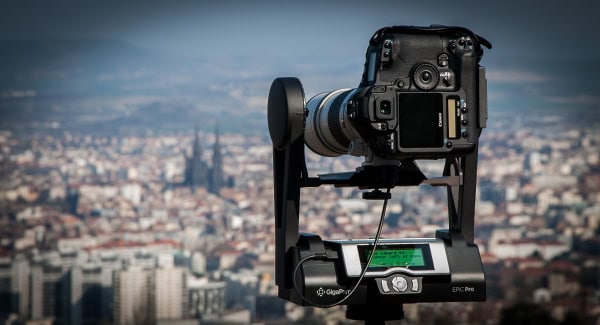
- Panoramic head: Allows rotation around the lens’s entrance pupil (no‑parallax point), eliminating parallax errors when stitching. A properly calibrated head is the difference between a clean stitch and a frustrating one.
- Stable tripod with a leveling base: Leveling the base (not just the head) ensures each frame rotates on a true horizontal plane, improving stitch accuracy and horizon alignment.
- Remote trigger or app control: Use the Sony Imaging Edge app or a wired remote to avoid vibrations. A 2‑second self‑timer is also effective.
Optional Add-ons
- Pole or car mount: When elevating the camera or moving between shots, use safety tethers and watch for wind. Vibrations can ruin sharpness—use higher shutter speeds and consider electronic first curtain shutter.
- Lighting aids: Constant lights or small flashes for interiors (keep lighting consistent across frames).
- Weather protection: Rain covers and microfiber cloths; moisture becomes visible across stitched skies and glass surfaces.
For a succinct refresher on panoramic head concepts and setup, read this excellent walkthrough. Panoramic head tutorial and parallax basics

Step-by-Step Shooting Guide
Standard Static Scenes
- Level and calibrate: Level the tripod using a leveling base. Adjust your panoramic head so the rotation axis passes through the lens’s entrance pupil. Use two vertical objects (near and far), rotate left/right, and fine‑tune until their relative position does not shift. Mark the rail position for 14mm and 20mm for repeatability.
- Manual exposure and WB: Set Manual mode to ensure consistent exposure across frames. Lock white balance to a specific Kelvin (e.g., 5600K daylight) or a custom preset—avoid Auto WB to prevent color mismatches.
- Focus: Switch to manual focus. Use magnified live view to focus at the hyperfocal distance (at 14–16mm and f/8, focusing around 1–1.2 m typically keeps everything from ~0.6 m to infinity sharp). Turn off focus breathing features and AF after locking focus.
- Stabilization: On tripod, disable IBIS and lens IS to prevent micro‑jitter or frame‑to‑frame shifts during long exposures.
- Shoot pattern (14mm rectilinear): 3 rows of 8 frames at yaw intervals of 45°, with pitch angles +45°, 0°, −45°. Add one zenith and one nadir shot. Aim for 30–35% overlap.
- Record the nadir: After the main set, tilt down to capture the ground/tripod area. Consider a “nadir offset” shot by moving the tripod slightly and shooting the floor for easier patching later.
HDR / High Dynamic Range Interiors
- Bracket: Use ±2 EV or ±3 EV in 3–5 frames per position to balance bright windows and interior shadows. The a7R V’s 14‑bit RAW files stitch well even with strong bracketing.
- Consistency: Lock WB and manual exposure base; let bracketing vary shutter time only. Avoid changing ISO within a bracket.
- Workflow tip: Use continuous bracketing mode with a remote. Wait briefly between angles to settle vibrations if using long exposures.
Low-Light / Night Scenes
- Exposure: Favor base ISO 100–200 and longer shutter speeds for clean results. On a7R V, ISO 400–800 remains very clean; use ISO 1600 only if wind/traffic calls for shorter exposures.
- Vibration control: Use a remote or 2‑second timer, electronic first curtain, and turn off IBIS/IS on tripod.
- Wind management: Use a weighted hook under the tripod. If wind gusts are strong, consider fewer but faster frames and stitch carefully.
Crowded Events
- Two passes: First pass for composition, second pass timed between moving subjects. Shoot overlaps generously (35–40%).
- Masking later: Plan to blend frames in post for ghosting control, especially at seam lines.
- Higher shutter speed: Aim for 1/200s+ at f/5.6–f/8, ISO 400–800 to freeze walking subjects.
Special Setups (Pole / Car / Drone)
- Pole: Use a rigid carbon pole and a compact pano head. Tether the camera. Keep shutter speeds shorter (1/200–1/500s) to defeat sway and vibrations; consider a higher ISO to achieve this.
- Car mounts: Avoid long exposures. Scout a safe, quiet area. Use wide overlaps; even small flex can shift framing between shots.
- Rooftops: Safety first. Use a tether to your harness or railing; add sandbags to the tripod in gusts.

Recommended Settings & Pro Tips
Exposure & Focus
| Scenario | Aperture | Shutter | ISO | Notes |
|---|---|---|---|---|
| Daylight outdoor | f/8–f/11 | 1/100–1/250 | 100–200 | Lock WB to Daylight or 5600K |
| Low light/night | f/4–f/5.6 | 1/30–1/60 (tripod) | 400–800 | Disable IBIS/IS on tripod; use remote |
| Interior HDR | f/8 | Bracket ±2 or ±3 EV | 100–400 | Expose for mid‑tones; merge HDR before stitching or use exposure‑fused stitch |
| Action / crowds | f/5.6–f/8 | 1/200+ | 400–800 | Two passes; mask moving people later |
Critical Tips
- Manual focus at hyperfocal: Reduces focus variance and ensures uniform sharpness across all frames.
- Nodal point calibration: For a 14–20mm rectilinear, expect the rail mark to be several centimeters forward of the mount. Use the near/far alignment method to find the exact entrance pupil and mark your rail for repeat use.
- White balance lock: Set a Kelvin value or a custom preset; avoid Auto WB changes between shots.
- RAW over JPEG: 14‑bit RAW from the a7R V maximizes dynamic range and color flexibility for HDR, de‑fringing, and perspective corrections.
- Stabilization: Turn off IBIS (and lens IS) on tripod. Re‑enable IS only when shooting handheld or on poles/vehicles with higher shutter speeds.
- Shutter mode: Electronic first curtain helps reduce vibrations; avoid fully electronic shutter under certain artificial lights to prevent banding.
Stitching & Post-Processing
Software Workflow
Import and cull duplicates, then either pre‑merge HDR brackets (Lightroom/Photoshop/Affinity) or let the stitching software perform exposure fusion. Rectilinear ultra‑wides typically need 20–35 frames for a full 360×180, depending on focal length and overlap. Recommended overlap: 30–35% for rectilinear, 25–30% for fisheye. PTGui or Hugin can auto‑detect control points, optimize lens parameters, and output high‑resolution equirectangular images (2:1 aspect).
If you’re evaluating stitchers, this practical write‑up is a good benchmark. PTGui reviewed for creating incredible panoramas
Cleanup & Enhancement
- Nadir patching: Use a clean floor plate shot for tripod removal. Many editors allow viewpoint optimization or AI‑based healing to remove the tripod shadow or patch complex patterns.
- Color and noise: Apply consistent white balance and HSL adjustments across the panorama. Reduce noise at the end of the workflow, especially for night scenes.
- Horizon and leveling: Re‑set the panorama’s horizon and verticals for architectural accuracy. Tiny roll errors become obvious once published.
- Export: Typical 360 equirectangular outputs are 12000×6000 or 16000×8000 JPEGs. Keep a master TIFF/EXR for archival and future re‑edits.
If you want formal best practices for head setup and capture technique, this step‑by‑step is a solid reference. Set up a panoramic head to shoot high‑end 360 photos
Disclaimer: Always check your chosen software’s latest documentation—features and naming may change with updates.
Useful Tools & Resources
Software
- PTGui (commercial, very fast template‑based batch stitching)
- Hugin (free, open source, powerful control point editing)
- Lightroom / Photoshop / Affinity Photo (RAW/HDR and cleanup)
- AI tripod removal tools (e.g., Generative Fill) for nadir patching
Hardware
- Panoramic heads (Nodal Ninja, Leofoto, Really Right Stuff)
- Carbon fiber tripods with leveling bases
- Remote shutters or camera apps
- Pole extensions and vehicle mounts (with safety tethers)
Disclaimer: product names are for search/reference; please check official sites for current specs.

Common Mistakes & How to Avoid Them
- Parallax errors: Calibrate your entrance pupil carefully and keep the camera rotating around that point.
- Exposure flicker: Always shoot fully manual exposure and locked white balance; bracket shutter speed only for HDR.
- Tripod shadows and nadir mess: Capture a dedicated nadir plate and use viewpoint correction or clone/heal in post.
- Ghosting from movement: Take two passes and mask; increase shutter speed where possible.
- Noise and banding: Keep ISO low on tripod, use electronic first curtain, watch for LED flicker under fully electronic shutter.
- Mount mismatch oversight: Don’t assume adapters exist—RF lenses do not practically adapt to Sony E. Plan your kit accordingly.
Field-Proven Scenarios
Indoor Real Estate
Set 14–16mm at f/8, base ISO 100–200, bracket ±2 EV in 5 frames per angle. Use 3 rows of 8 frames plus zenith and nadir. Lock WB to 4000–4500K for warm LED interiors. Turn off all auto-light adjustments (Auto Lighting Optimizer, DRO) to keep shots consistent.
Outdoor Sunset Landscape
At 14mm, f/8, ISO 100. Meter for mid‑tones and bracket ±2 EV if the sun is in-frame. Shoot quickly through golden hour to keep sky gradients consistent. Use a graduated filter in post rather than a physical grad to avoid seam mismatches.
Event Crowds
Switch to 1/250s at f/5.6–f/8, ISO 400–800. Overshoot overlap to 35–40%. Make two passes and note scene timings when groups disperse. Expect some masking in post.
Rooftop on a Breezy Day
Lower your center column, add a sandbag, and use 1/125–1/250s shutter. Avoid tall poles unless wind is under 10–12 mph. If you must elevate, shorten the set (fewer frames, bigger overlap) to minimize total time aloft.
Car-Mounted Drive-by
Not recommended for multi‑row panos due to parallax changes while moving. If essential, park safely, shoot static, or use a 360 one‑shot camera as a location scout and return later with the pano rig.
If you want more background on lens choice vs. resolution for spherical panos, this technical reference is useful. DSLR spherical resolution and coverage
Frequently Asked Questions
-
Can I shoot handheld panoramas with the a7R V?
Yes, for simple cylindrical panos. Use fast shutter (1/250s+), overlap 40–50%, lock exposure/WB, and keep the camera level. For full 360×180 with clean nadirs and straight lines, a tripod and panoramic head are strongly recommended.
-
Is the Canon RF 14–35mm f/4L wide enough for a single‑row 360?
For cylindrical panos, yes. For a full spherical 360×180, a single row won’t cover zenith and nadir; plan multi‑row capture. At 14mm rectilinear, 3 rows of 8 (±45° and 0°) plus zenith/nadir is a reliable pattern.
-
Do I need HDR for interiors with bright windows?
Usually yes. Bracketing ±2 or ±3 EV lets you recover window views and interior details without excessive noise. You can pre‑merge to HDR or use exposure fusion in PTGui/Hugin.
-
How do I avoid parallax issues?
Rotate around the lens’s entrance pupil. Calibrate with a near/far object test and mark your rail positions for 14mm and 20mm. Keep the tripod level so the yaw axis remains vertical.
-
What ISO range is safe on the a7R V for low‑light panos?
On tripod, target ISO 100–400 and lengthen exposure. ISO 800 is still clean; ISO 1600 is usable when needed. Noise reduction in post helps, but prioritize lower ISO and stable support.
-
Can I create Custom Modes for pano on the a7R V?
Yes—save a pano preset with Manual exposure, manual focus, IBIS off, fixed WB, EFCS on, and your bracketing settings. This speeds up on‑site setup.
-
What’s the best tripod head for this setup?
A multi‑row panoramic head with precise fore‑aft and lateral adjustments (e.g., Nodal Ninja, Leofoto, RRS). Ensure it’s rated for your camera weight and has clear scale markings for repeatability.
Safety, Compatibility, and Honest Limitations
Compatibility: The Canon RF 14–35mm f/4L IS USM does not natively mount to the Sony a7R V. For a Sony body, choose a native FE ultra‑wide or adapt Canon EF glass with an EF–E adapter. If you already own the RF lens and want to keep it, consider renting a Canon RF body for the shoot. Don’t attempt unverified adapters—risk of poor focus, electronics issues, or inability to reach infinity focus is high.
Safety: Always tether on roofs, avoid extending poles near roads or power lines, and be mindful of wind. Keep fingers clear of rotating pano head arms. Protect gear from rain and dust; moisture on a single frame can create visible seams after stitching.

For additional reading on pano technique and FAQs across camera/lens types, this resource is handy. DSLR virtual tour FAQs and gear considerations