Why This Camera & Lens Are Great for Panoramas
If you’re researching how to shoot panorama with Sony A7 IV & Canon RF 15-35mm f/2.8L IS USM, here’s the straight talk: the Sony A7 IV is a superb 33MP full-frame mirrorless body with class-leading color, ~14 stops of dynamic range at base ISO, and robust in-body image stabilization (IBIS). The Canon RF 15-35mm f/2.8L IS USM is an exceptional ultra-wide rectilinear zoom—sharp across the frame at f/5.6–f/8, minimal lateral CA, and well-controlled distortion for a 15mm, making it ideal for architectural and landscape panoramas.
Important mount note (trust and transparency): there is no practical, widely available adapter to use Canon RF lenses on Sony E-mount bodies with electronic aperture control or autofocus. In other words, this exact camera–lens pairing is not natively compatible. Practically, you can either:
- Keep the Sony A7 IV and use a comparable Sony FE ultra-wide (e.g., FE 16–35mm f/2.8 GM or FE 16–35mm f/4 G).
- Keep the Canon RF 15–35mm and use it on a Canon RF-mount body (e.g., EOS R5/R6/R8).
All the pano concepts, numbers, and methods below apply directly to the Sony A7 IV with a 15–16mm rectilinear lens. If you do manage a specialty setup to mount the RF 15–35 on Sony with manual-only control, treat it as a manual-aperture, manual-focus lens and follow the same technique.

Quick Setup Overview
- Camera: Sony A7 IV — Full-frame (35.9 × 23.9 mm), 33MP (approx. 7008 × 4672), pixel pitch ~5.1 µm, ~14 stops DR at ISO 100, excellent color and highlight roll-off.
- Lens: Canon RF 15–35mm f/2.8L IS USM — Rectilinear ultra-wide zoom. Sharpest at f/5.6–f/8, mild vignetting at 15mm wide open, low lateral CA. Note: Electronic control not available on Sony E-mount.
- Estimated shots & overlap (full-frame, portrait orientation, ~25% overlap):
- 15mm: ~7 shots per row; 3 rows (+45°, 0°, –45°) + zenith + nadir ≈ 23 frames for a high-quality 360°.
- 24mm: ~9 shots per row; 3 rows + Z/N ≈ 29 frames (more resolution, more shooting time).
- 35mm: ~13 shots per row; typically 4 rows + Z/N ≈ 54 frames (maximum detail, longest workflow).
- Difficulty: Intermediate (precise nodal alignment and consistent exposure required).
Planning & On-Site Preparation
Evaluate Shooting Environment
Before you start, scan the scene for reflective glass, moving people, foliage in the wind, and strong backlight. In interiors, note mixed lighting (daylight + tungsten/LED) which complicates white balance. If shooting through glass, keep the front element close to the glass (1–3 cm) to minimize reflections, and use a black cloth or lens hood to block stray light. For outdoor sunset panoramas, plan for quickly changing luminance—consider bracketing early.
Match Gear to Scene Goals
The A7 IV’s base ISO latitude and color depth make it excellent for HDR panoramas and interior real estate work. At ISO 100–200 you can expect clean shadows and robust highlight recovery. For indoor work without flash, ISO 400–1600 is safe with careful exposure; 3200 is still usable for panoramas because noise averages slightly during stitching. The 15–35mm rectilinear field of view helps keep architecture straight and natural (as opposed to fisheye), at the cost of more frames. Choose 15–18mm when you want faster capture and easier zenith coverage; use 24–35mm for maximum detail (gigapixel-style pans) at the expense of time and potential stitching complexity.
Pre-shoot Checklist
- Charge two batteries, clear and format two fast UHS-II SD cards.
- Clean lens front/rear and camera sensor; bring a blower and microfiber cloth.
- Level your tripod using a leveling base; verify panoramic head calibration for this focal length.
- Safety: weigh down tripod in wind, tether on rooftops, avoid crowd trip hazards, double-check car mounts.
- Backup capture: after your main pass, do a second safety pass or a second nadir frame for patching.
Essential Gear & Setup
Core Gear
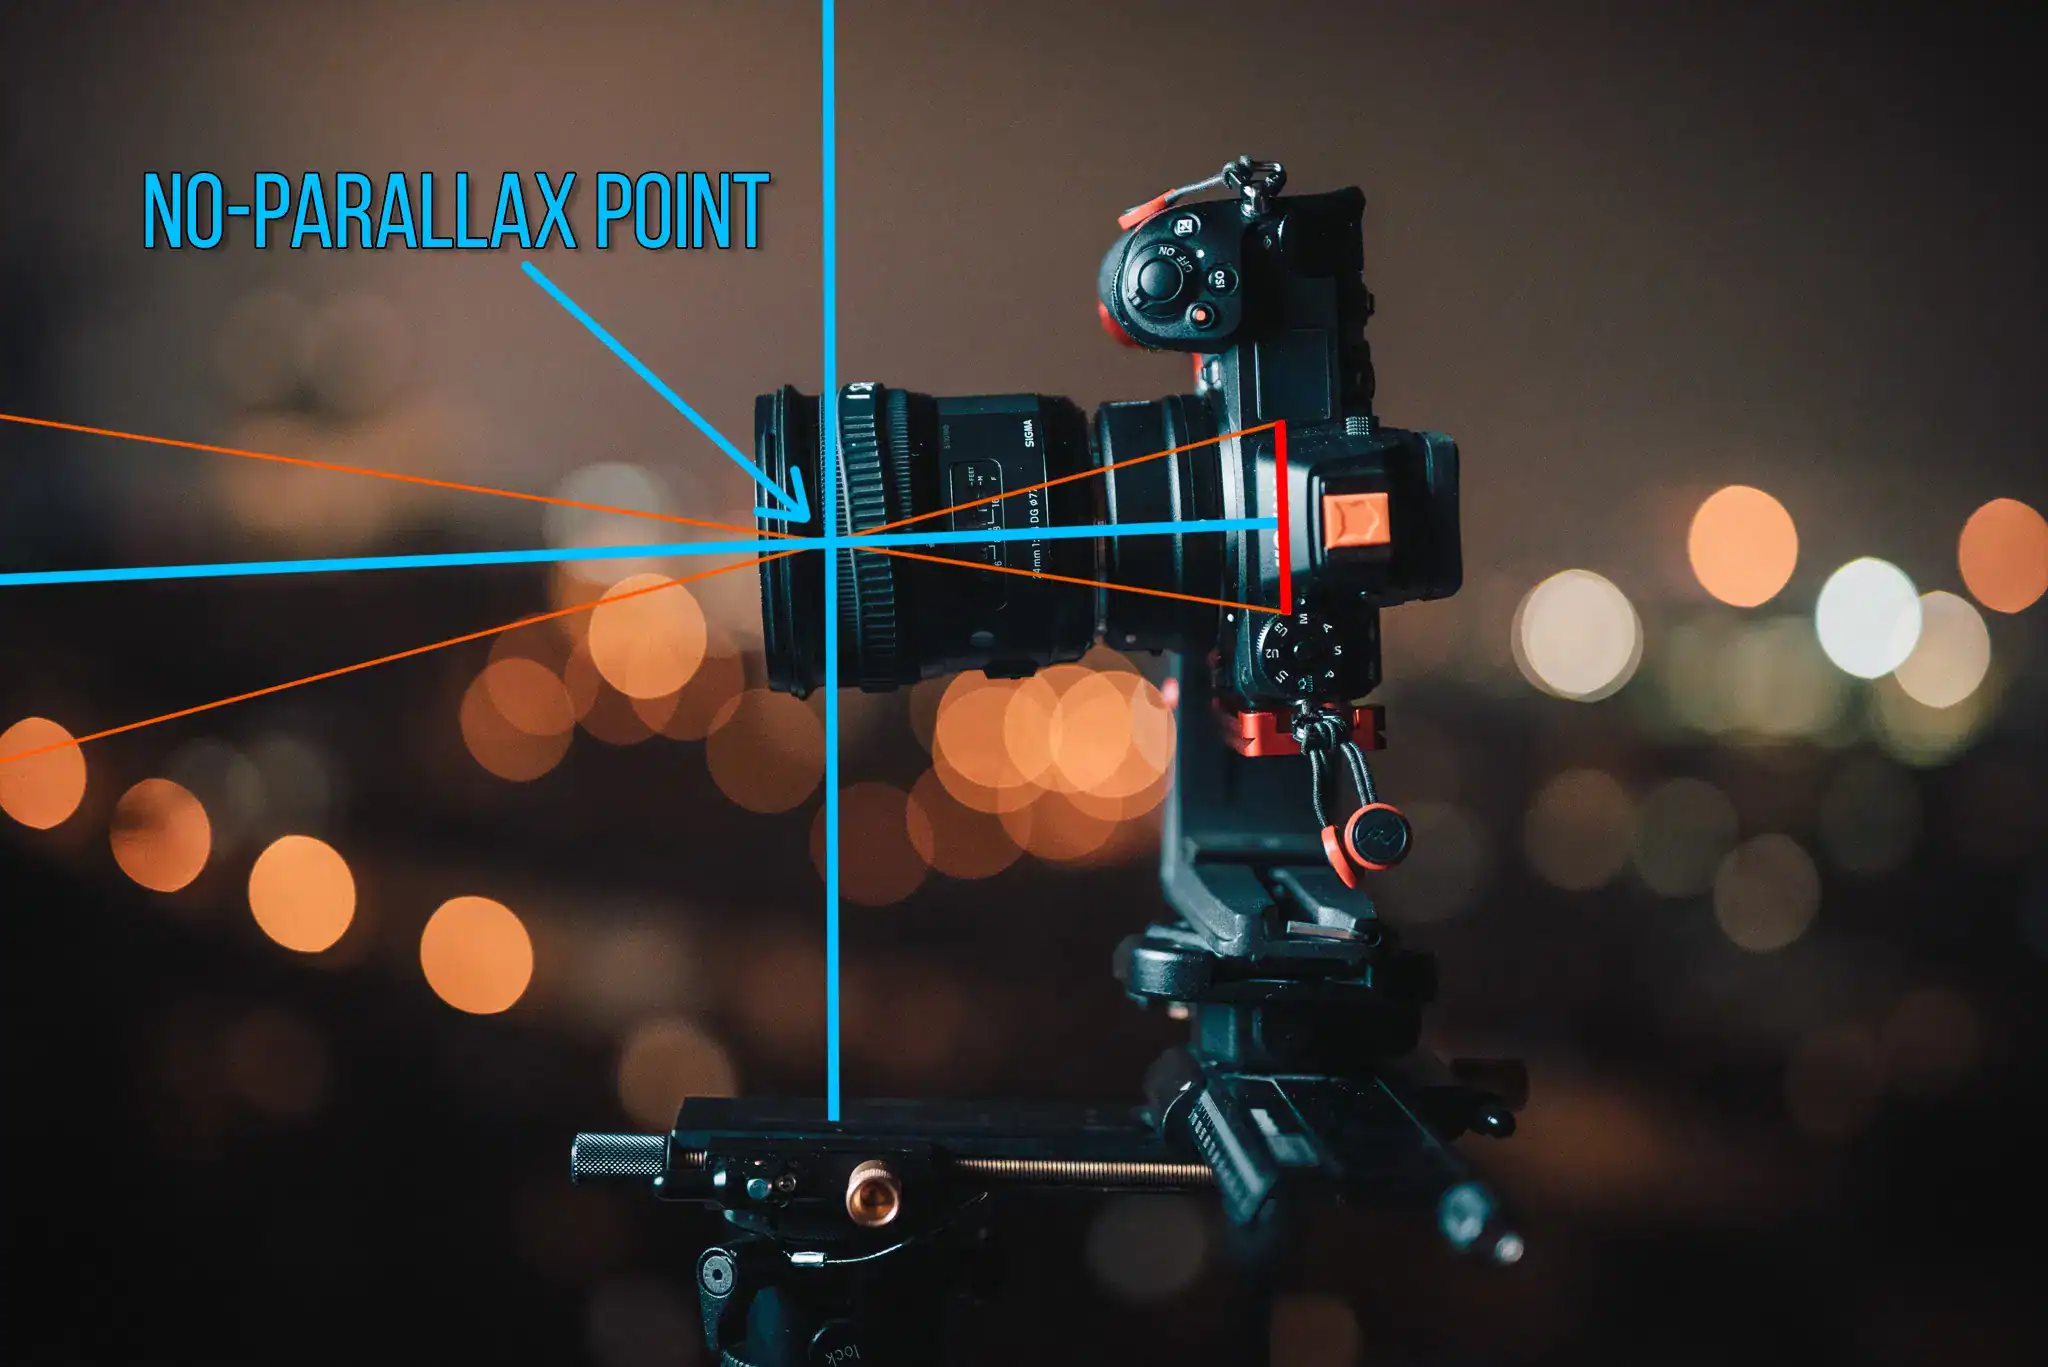
- Panoramic head: Enables rotation around the lens’s entrance pupil (nodal point) to eliminate parallax—critical for indoor spaces with near objects. A two-axis head with fore-aft and left-right rails lets you precisely find and lock the no-parallax point.
- Stable tripod with leveling base: A geared leveling base speeds up setup and keeps the horizon stable across rows.
- Remote trigger or app: Use the Sony Imaging Edge Mobile app or a wired remote to avoid vibrations.
Optional Add-ons
- Pole or car mount: Use safety tethers, check wind load, and avoid driving above low speeds when mounting outside a vehicle.
- Small LED panels for interior fill light; avoid mixed color temps, or gel lights to match ambient.
- Rain covers and silica gel packs if moisture is expected.

Step-by-Step Shooting Guide
Standard Static Scenes
- Level and align the nodal point. Mount the camera in portrait orientation. Slide the camera on the pano head’s rails until foreground and background edges don’t shift relative to each other when you pan. Mark the rail position for 15mm, 24mm, and 35mm; it changes with focal length.
- Manual exposure and white balance. Meter for the midtones at the brightest row you’ll shoot (e.g., horizon in a sunset). Set manual WB (Daylight/Cloudy or a Kelvin value) to keep colors consistent. Disable Auto ISO.
- Capture with tested overlap. For 15mm: shoot 3 rows at +45°, 0°, –45°, ~7 frames per row with ~25% overlap. Add one zenith and one nadir frame. Rotate consistently, lock the tilt angles, and use the same exposure for the entire panorama.
- Take a dedicated nadir shot. After lifting the rig or moving the tripod slightly to one side, shoot the ground plate that will replace your tripod in post.
HDR / High Dynamic Range Interiors
- Bracket ±2 EV (3 or 5 frames) to balance bright windows and dark interiors. Keep shutter speed as the bracketing variable; aperture constant at f/8.
- Lock WB (e.g., 4000–5000K for mixed LED daylight) to avoid bracket-to-bracket color shifts.
- Keep IBIS off on tripod to avoid micro-shifts between brackets. Use a remote or 2s timer.
Low-Light / Night Scenes
- Use longer exposures and the lowest practical ISO (100–800 on the A7 IV; 1600 is acceptable if needed). Expose to protect highlights (city lights) and let the shadows lift in post.
- Turn off stabilization on tripod (IBIS and lens IS). Even with IBIS, a rigid tripod and remote trigger yield sharper results.
- Mind star trails and moving clouds. If you need to freeze stars, keep shutter ≤ 10–15 s at 15–20mm.
Crowded Events
- Shoot a fast primary pass for coverage. Then wait for gaps and shoot a second pass of key sectors to patch moving subjects later.
- Use 1/200s or faster if you want to freeze motion in the stitch. Mask and blend frames in PTGui or Photoshop.
Special Setups (Pole / Car / Rooftop)
- Secure gear with clamps and tethers. On poles, keep the rotation slow and steady; check balance to avoid sway.
- Plan for wind. Higher elevation increases wind load; pick a faster shutter speed to mitigate micro-motion.
- For car mounts, shoot at very low speed or parked. Vibrations cause micro-blur and alignment issues; consider higher ISO to shorten shutter if necessary.
Recommended Settings & Pro Tips
Exposure & Focus
| Scenario | Aperture | Shutter | ISO | Notes |
|---|---|---|---|---|
| Daylight outdoor | f/8–f/11 | 1/100–1/250 | 100–200 | Manual WB (Daylight). Lock exposure across all frames. |
| Low light/night | f/4–f/5.6 | 1/4–1/30 | 100–800 (1600 if needed) | Tripod, remote; turn IBIS off on tripod. |
| Interior HDR | f/8 | Bracket ±2 EV | 100–400 | Expose for windows, blend brackets later. |
| Action / moving crowd | f/5.6–f/8 | 1/200+ | 400–800 | Two-pass method; prioritize consistent exposure. |
Critical Tips
- Manual focus at hyperfocal distance. At 15mm and f/8 on full-frame, focusing ~1 m gives sharpness from roughly 0.6 m to infinity. Use magnified live view, then switch to MF.
- Nodal point calibration. Place two vertical objects (near/far), align them, and pan. If alignment shifts, adjust the fore-aft rail. Repeat until the near/far overlap remains constant.
- White balance lock. Choose a Kelvin value or a fixed preset; avoid AWB to prevent color shifts between frames.
- RAW over JPEG. The A7 IV’s 14-bit RAW files retain highlight detail and shadows, essential for HDR panoramas and mixed lighting.
- Stabilization on/off. Handheld: IBIS On. Tripod: IBIS Off; lens IS off (note RF lens IS won’t operate on Sony).
Field-Proven Shot Counts (Portrait Orientation, ~25% Overlap)
- 15mm: 3 rows × 7 around + 1 zenith + 1 nadir ≈ 23 frames (balanced speed/coverage).
- 24mm: 3 rows × 9 around + Z/N ≈ 29 frames (more detail, longer shoot).
- 35mm: 4 rows × 13 around + Z/N ≈ 54 frames (gigapixel-grade detail).
Stitching & Post-Processing
Software Workflow
Import RAWs to Lightroom or Capture One, apply lens-agnostic baseline corrections (disable auto profile corrections if they distort geometry unpredictably), set a consistent WB, and synchronize exposure tweaks. Export 16-bit TIFFs to a stitcher: PTGui (fast, reliable, powerful masking), Hugin (open-source), or Photoshop’s Photomerge for simple cylindrical pans. With rectilinear ultra-wide (15–35mm), plan on 20–25% overlap. Fisheye lenses can get by with fewer frames and 25–30% overlap, but you avoid fisheye distortion by staying rectilinear here. For deep dives into choosing a stitcher and setup techniques, see a review of PTGui and panoramic head setup best practices. PTGui review: robustness and masking advantages. Panoramic head setup principles (Meta/Oculus).
Cleanup & Enhancement
- Nadir patching: use PTGui’s Viewpoint correction or export to Photoshop/Affinity and clone. AI content-aware tools can remove tripod legs convincingly.
- Color and noise: unify WB across rows, apply gentle noise reduction to shadows, and avoid over-sharpening edges that cross seams.
- Leveling: adjust roll/pitch/yaw for a true horizon. Most stitchers provide an “Align to grid” or “Straighten horizon” tool.
- Export: for VR, export an equirectangular 2:1 image (e.g., 16384×8192 for high-res). For web galleries, a 12000×6000 JPEG (quality 9–10) is a great balance of quality and size.

Resolution planning tip: spherical pano resolution depends on focal length and sensor pitch. For theory-minded readers, the Panotools wiki has a useful reference table on DSLR spherical resolution. Spherical resolution and FOV math (Panotools).
Useful Tools & Resources
Software
- PTGui panorama stitching (masking, viewpoint correction, batch HDR)
- Hugin (open source, powerful control points)
- Lightroom / Photoshop for RAW prep and retouching
- AI tripod removal and sky replacement tools (use sparingly for realism)
Hardware
- Panoramic heads: Nodal Ninja, Leofoto, Sunwayfoto
- Carbon fiber tripods with a leveling base
- Wireless remote shutters or smartphone apps
- Pole extensions and vehicle mounts with safety tethers
Disclaimer: software/hardware names provided for search reference; check official sites for details.
Real-World Case Studies
Indoor Real Estate (Bright Windows)
At 15mm f/8 on the A7 IV, set ISO 100–200. Bracket ±2 EV (3–5 frames) across the full capture. Shoot 3 rows × 7 frames with consistent exposure and WB. In PTGui, enable HDR fusion and use “Exposure fusion” or “HDR merge” depending on your aesthetic. This keeps window detail while maintaining clean interior shadows.
Outdoor Sunset (Fast-Changing Light)
Meter the brightest sky near the sun and lock exposure. Move quickly: shoot the horizon row first (where light changes are most obvious), then tilt up and down. If the sun slips behind clouds mid-pass, shoot a second quick horizon pass to give yourself replacement frames for uneven segments.
Crowded Event (Ghosting Control)
Use 1/250s, f/5.6–f/8, ISO 400–800. Do a fast laddered rotation (e.g., 6–7 around if you can), then a second pass pausing for gaps. In stitching, use masks to prefer frames with fewer people in overlapping areas.
Rooftop or Pole (Wind Management)
Keep shutters above 1/100s at 15mm if there’s a breeze. Add weight to the tripod, use a sturdy panoramic head, and avoid extending center columns. For poles, pre-focus, lock exposure, and rotate smoothly. Safety first: use a tether, and don’t lean out over edges.
Watch: Pano Head Setup and Shooting Flow
This concise walkthrough reinforces nodal alignment and a smart capture order that reduces stitching errors.
For a deeper primer on panoramic heads and rotation best practices, see this practical guide. Panoramic head tutorial (360 Rumors).
Safety, Care, and Backup
Wind and moving platforms are the main risks. Always secure your rig with a strap or tether, especially on rooftops and poles. Turn off IBIS and IS when on a tripod to prevent sensor/lens micro-motions. Keep silica gel in the bag in humid environments and wipe down gear after sea spray exposure. Back up cards in the field to a portable SSD (and, when possible, to cloud later). For mission-critical shoots, capture a second panorama pass to have insurance against unexpected stitch failures.

Mount Compatibility Clarified
Because Canon RF lenses are not natively adaptable to Sony E-mount with full electronic control, you won’t have autofocus or aperture control if you somehow mount the RF 15–35 on the A7 IV. Realistically, use a Sony FE 16–35mm (f/2.8 or f/4) on the A7 IV for the same pano workflow, or use the Canon RF 15–35 on a Canon RF body. All the framing counts, overlap targets, HDR bracketing, and nodal alignment guidance in this article remain accurate for a 15–16mm rectilinear on the A7 IV.
Common Mistakes & How to Avoid Them
- Parallax error: Always align the entrance pupil using a calibrated panoramic head.
- Exposure flicker: Use manual exposure and manual WB; avoid any auto settings mid-pan.
- Tripod and photographer shadows: Capture a separate nadir frame and patch later.
- Ghosting from moving subjects: Shoot a second pass and mask in the stitcher.
- Night noise: Keep ISO as low as possible and extend shutter time on a sturdy tripod.
Frequently Asked Questions
-
Can I shoot handheld panoramas with the Sony A7 IV?
Yes, for simple single-row panos outdoors. Use 15–20% overlap and a fast shutter. But for 360° spherical panoramas—especially indoors—use a tripod and a panoramic head to avoid parallax and stitching errors.
-
Is the Canon RF 15–35mm wide enough for a single-row 360°?
Not for a full sphere. At 15mm rectilinear, you still need multi-row capture to reach the zenith and nadir. A typical high-quality set is 3 rows × ~7 frames, plus zenith and nadir.
-
Do I need HDR for interiors with bright windows?
Usually yes. Bracketing ±2 EV (3–5 frames) retains window detail while keeping interiors clean. The A7 IV has strong dynamic range, but HDR bracketing maintains consistent tonality across the pano.
-
How do I avoid parallax issues?
Mount the camera on a calibrated panoramic head and rotate around the lens’s entrance pupil. Perform a quick near/far test on location and mark your rail positions for 15mm, 24mm, and 35mm.
-
What ISO range is safe on the A7 IV for low light panoramas?
ISO 100–800 is ideal; 1600 remains very usable, especially because stitching averages noise slightly. Favor longer exposures on a tripod over pushing ISO high.
-
Can I set up custom modes to speed pano work?
Yes. Save a “Pano” custom setup (e.g., Manual mode, f/8, fixed WB, IBIS Off, 2s timer, RAW) to a Memory Recall slot so you’re ready immediately on location.
-
Best tripod head choice for this setup?
A two-axis panoramic head (e.g., Nodal Ninja or Leofoto) with fore-aft and lateral adjustment. Add a leveling base for fast, repeatable setup.
Bonus: Stitching Example and Batch HDR
When batch-processing HDR brackets for an entire 360°, keep naming consistent (e.g., _EV0, _EV-2, _EV+2) so stitchers can auto-group. In PTGui, you can enable “Link exposure” and “Link white balance” for all images to maintain consistency throughout the panorama. For more background knowledge and common questions from DSLR/mirrorless virtual tour shooters, this reference is helpful. DSLR/mirrorless 360 virtual tour FAQ.