Why This Camera & Lens Are Great for Panoramas
If you want to learn how to shoot panorama with Nikon Z7 II & Sigma 8mm f/3.5 EX DG Circular Fisheye, you’ve picked a high-resolution, low-noise powerhouse paired with a fast, super-wide circular fisheye. The Nikon Z7 II is a 45.7 MP full-frame mirrorless camera with a BSI CMOS sensor (approx. 35.9 × 23.9 mm) and excellent base ISO 64 dynamic range—roughly 14+ stops—so highlights don’t blow easily and shadows remain clean when you lift them. Its pixel pitch is about 4.35 μm, which translates to abundant detail while still maintaining respectable low-light performance when you manage exposure carefully.
Paired with the Sigma 8mm f/3.5 EX DG Circular Fisheye (Nikon F mount, used via Nikon FTZ/FTZ II adapter), you get a 180° field of view in all directions within a circular image. That coverage means fewer frames are required for a 360×180° panorama—often 3 to 4 shots around plus a nadir—accelerating capture and reducing stitching seams. The fisheye’s projection is circular and typically behaves like an equisolid-angle fisheye; modern stitchers handle it easily once you declare the lens type correctly.
Mirrorless live view, focus peaking, and in-view histogram on the Z7 II make manual exposure and manual focus quick and reliable—two things that matter more than autofocus in panorama work. The combo is compact enough for poles or rooftops, and the FTZ adapter maintains full mechanical stability with no glass, so optical quality is unchanged.
Quick Setup Overview
- Camera: Nikon Z7 II — Full-frame (FX), 45.7 MP BSI sensor, ISO 64–25,600 native (expandable), 14-bit RAW, 5-axis IBIS, dual card slots (CFexpress/XQD + SD UHS-II).
- Lens: Sigma 8mm f/3.5 EX DG Circular Fisheye — Circular fisheye for full-frame; sharp from f/5.6–f/8; expect typical lateral CA and flare susceptibility with strong light sources; close focus ~13.5 cm. Use with FTZ/FTZ II.
- Estimated shots & overlap (tested): 3 around (120° yaw) + zenith + nadir, or 4 around (90° yaw, slight up-tilt 5–10°) + nadir. Aim 30–40% overlap between frames for robust stitching.
- Difficulty: Easy–Medium. Fisheye reduces shot count but demands careful nodal alignment to avoid parallax.
Planning & On-Site Preparation
Evaluate Shooting Environment
Start by reading the light and movement. Interiors with windows or mixed lighting benefit from HDR bracketing. Glass, mirrors, and polished floors create reflections that magnify stitch errors; shoot a little further from these surfaces and try to keep the lens center perpendicular to any large glass panels to minimize flare and ghosting. Outdoors, watch for sun placement—circular fisheyes can amplify flare if the sun sits near the frame edge.

Match Gear to Scene Goals
The Nikon Z7 II’s base ISO 64 and wide DR are perfect for high-contrast sunsets and interiors with bright windows. For static scenes on tripod, stay at ISO 64–200 when possible. If you need to freeze people, the Z7 II maintains clean detail up to ~ISO 800–1600, but expect some DR loss above ISO 800. The Sigma 8mm circular fisheye excels when you want to minimize shot count, reduce capture time, and keep parallax risk low. The trade-off is heavy fisheye distortion, which your stitcher will correct into an equirectangular output. For tight spaces or in crowds, fewer shots mean fewer moving-object conflicts and faster completion.
Pre-shoot Checklist
- Power & storage: Full batteries, fast CFexpress/XQD and UHS-II SD cards. 14-bit RAW at 45.7 MP can be ~60 MB per frame; bracketing multiplies this.
- Clean optics: Wipe the fisheye’s front element; tiny smudges and dust are very visible. Check the sensor, too.
- Stability: Level the tripod; verify your panoramic head settings (nodal/entrance pupil position) for this lens and FTZ adapter.
- Safety: On rooftops or poles, tether the camera, watch wind gusts, and confirm your rig’s load limits.
- Backup workflow: Shoot a second pass, or at least a few extra frames of critical sectors (into the sun, mirrors, crowds).
Essential Gear & Setup
Core Gear
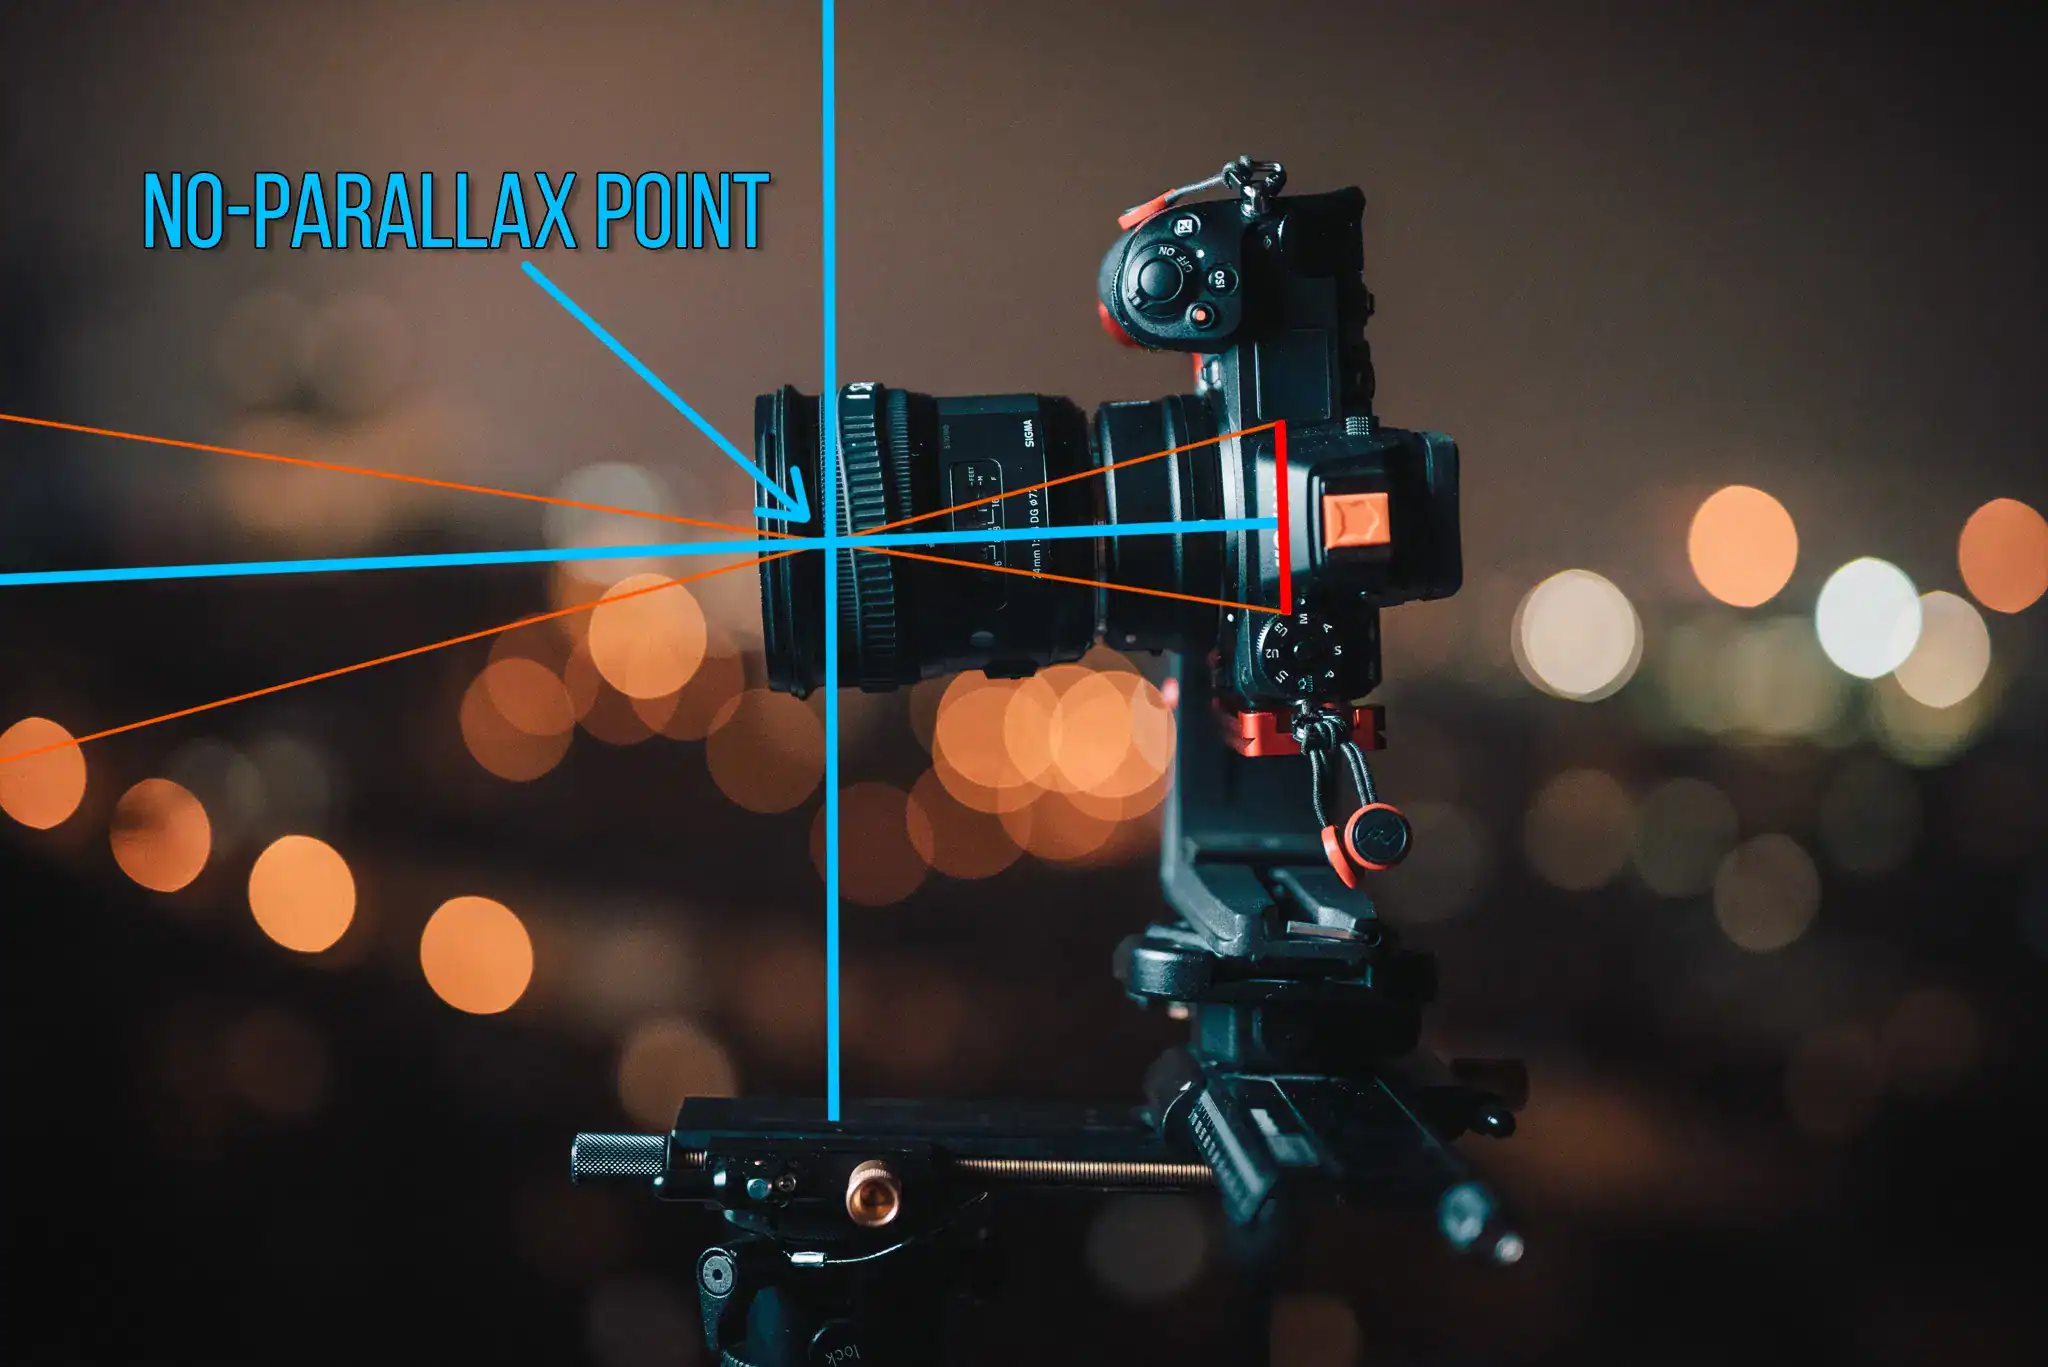
- Panoramic head: Enables precise yaw increments and fore–aft adjustment to align the entrance pupil (nodal point) over the rotation axis. This eliminates parallax between near and far objects, leading to seamless stitches.
- Stable tripod with a leveling base: Leveling keeps pitch/roll consistent so the stitcher doesn’t need to fight a tilted horizon. A leveling base speeds setup dramatically.
- Remote trigger or SnapBridge app: Prevents vibrations. For long exposures, use mirrorless benefits (no mirror slap) but be mindful of shutter shock at certain speeds—use Electronic Front Curtain or silent shutter where suitable.
Optional Add-ons
- Pole or car mount: Great for rooftops, balconies, or vehicle-based surveys. Secure with a safety tether; check all clamps; avoid high winds.
- Lighting aids: Small LED panels or bounce cards for dark corners in interiors. Keep them fixed across the set to maintain consistency.
- Weather gear: Rain cover and lens hood ring for drizzle. Wipe the fisheye often—drops are very noticeable.
Step-by-Step Shooting Guide
Standard Static Scenes
- Level and align the head: Level the tripod, then the pano head. Slide the camera on the rail until the entrance pupil sits over the pivot point. For the Sigma 8mm on Z7 II with FTZ, a practical starting offset is typically in the 5.8–6.2 cm range forward of the sensor plane—fine-tune with a near/far test.
- Manual exposure and white balance: Set M mode, meter a mid-tone, lock exposure for all frames. Use fixed WB (Daylight/Tungsten/Custom) so stitches don’t show color seams.
- Capture sequence: For reliability, shoot 4 around at 90° yaw with a slight upward tilt (5–10°) to help cover the zenith. Then shoot a nadir (down) frame for tripod removal. A 3-around + zenith + nadir set also works if your head is perfectly calibrated.
- Record a nadir: After the around shots, tilt down 90° for a clean floor capture. If possible, offset the tripod slightly and shoot a “patch” shot to clone over the tripod later.

HDR / High Dynamic Range Interiors
- Bracket exposures: Use ±2 EV (3 or 5 frames) at each yaw angle to recover windows and deep shadows. Keep shutter speed the changing variable; maintain aperture and ISO.
- WB lock: Fix white balance per scene. HDR amplifies any mismatch between frames.
- Keep aperture around f/8: Maximizes edge sharpness and reduces CA with this fisheye. The Z7 II at ISO 64–200 will maintain clean shadows after merging.
Low-Light / Night Scenes
- Long exposures on tripod: Start at ISO 64–200, f/4–f/5.6, and slower shutter speeds (1–8 s or more). IBIS off on tripod to avoid unintended sensor micro-movements.
- Remote or self-timer: Use 2 s timer or a remote. Consider EFCS or silent shutter to eliminate any shutter-induced vibration.
- Watch hot lights: Street lamps can cause flare halos on fisheyes; adjust yaw slightly and shoot an extra frame to mask later if needed.
Crowded Events
- Two passes strategy: First pass for structure and composition, second pass waiting for gaps in crowds. Mark frame numbers to keep track of the cleanest set.
- Faster shutter where needed: If people matter, target 1/200 s at f/5.6–f/8, ISO 400–800. You’ll trade DR for fewer ghosting artifacts.
- Mask in post: Use your stitcher’s masking tools to choose subjects from the cleanest pass.
Special Setups (Pole / Car / Drone)
- Secure gear: Use a safety tether and double-check clamps. The Z7 II + FTZ + Sigma is compact but still a sizable sail in wind.
- Slower rotation: Stop between frames to damp vibrations. On a pole, 4 shots around is safer than 3 for overlap robustness.
- Avoid extreme speeds: For car mounts, keep to slow speeds on smooth roads. Use higher shutter speeds (1/500+) to minimize blur if shooting handheld from a window (not ideal).
Field-Proven Mini Case Studies
Indoor Real Estate
Tripod on a leveling base, f/8, ISO 64–200. Bracket ±2 EV to keep windows natural. 4-around + nadir set. Mask out moving curtains or ceiling fans in post.
Outdoor Sunset
Expose for the sky at base ISO and merge shadows later. Consider a second, slightly brighter set for the foreground. Use 4-around tilted up 5–10° to minimize a dedicated zenith shot.
Event Crowds
Single exposure, 1/200–1/500 s, ISO 400–800. Capture two passes; blend. Fisheye reduces the number of frames, which means fewer subject duplicates to fix later.
Rooftop/Pole
Wind is your primary enemy. Tie off the pole, use 4-around at 90°. Shoot a nadir patch off-center after moving the pole slightly.
Car-Mounted Capture
Not ideal for perfection, but feasible for quick surveys. Short exposures, high shutter, and extra overlap. Expect to fix stitching in areas with near objects (signs, poles).
Recommended Settings & Pro Tips
Exposure & Focus
| Scenario | Aperture | Shutter | ISO | Notes |
|---|---|---|---|---|
| Daylight outdoor | f/8–f/11 | 1/100–1/250 | 64–200 | Lock WB (Daylight). Maximize DR at ISO 64. |
| Low light/night | f/4–f/5.6 | 1/30–8 s | 64–400 | Tripod, remote trigger; IBIS off; use EFCS or silent shutter. |
| Interior HDR | f/8 | Bracket ±2 EV | 64–200 | Balance windows and lamps; consistent WB per room. |
| Action / moving subjects | f/5.6–f/8 | 1/200+ | 400–800 | Freeze motion; do two passes and mask. |
Critical Tips
- Focus: Use manual focus and set just shy of infinity or at hyperfocal (around f/8). Use focus peaking and magnified live view on the Z7 II.
- Nodal point calibration: Start around 5.8–6.2 cm forward of the sensor plane with this combo, then refine with a near/far alignment test. Mark your rail for repeatability.
- White balance: Lock WB to avoid color seams. Create a custom WB for tricky mixed lighting.
- RAW over JPEG: 14-bit lossless compressed RAW provides superior DR and color latitude for HDR and heavy grading.
- IBIS: Turn off on tripod. For handheld quick grabs, IBIS can help at moderate shutter speeds.
- File discipline: Use consistent yaw increments (e.g., 0°, 90°, 180°, 270°), and voice-note or hand-sign at frame start to identify sets quickly later.
Stitching & Post-Processing
Software Workflow
PTGui and Hugin are industry staples. Declare the lens as a circular fisheye and let the optimizer detect projection parameters (the Sigma often behaves like equisolid-angle). For this lens, 30–40% overlap ensures strong control points. Fisheye sets are often easier to stitch (fewer shots and broad overlap), but you must manage parallax. Export equirectangular 2:1 at 8K (7680×3840) or 12–16K for ultra-detailed projects. For guidance on tool choice and quality benchmarks, see Fstoppers’ PTGui review at the end of this section. Read a PTGui review focused on pro-level panoramas.

Cleanup & Enhancement
- Nadir/tripod removal: Use a separate nadir patch shot and PTGui’s Viewpoint optimization or clone tools in Photoshop. Specialized AI patchers can also help.
- Color and noise: Correct color casts from mixed lighting and apply gentle noise reduction if you used higher ISOs. The Z7 II’s files handle this gracefully.
- Level the horizon: Use vertical lines to set pitch/roll; keep true verticals upright for architectural work.
- Output formats: Export equirectangular JPEG for web/VR platforms, or 16-bit TIFF for archival/mastering. For Meta Quest and other VR targets, ensure the 2:1 aspect and correct metadata. See Meta’s guidance for DSLR 360 photo workflows.
Industry overlap recommendations are about 25–30% for fisheyes and 20–25% for rectilinear lenses. Adjust if you have nearby objects or moving subjects. For general panoramic head setup best practices, this tutorial is helpful: Panoramic head setup and alignment guide.
Watch: Panorama Technique Overview
Prefer to see it done? This video covers panorama fundamentals that align well with the workflow above.
Useful Tools & Resources
Software
- PTGui panorama stitching
- Hugin (open source)
- Lightroom / Photoshop for RAW and cleanup
- AI tripod/nadir removal tools
Hardware
- Panoramic heads (Nodal Ninja, Leofoto)
- Carbon fiber tripods with leveling bases
- Wireless remote shutters
- Pole extensions / car mounts with safety tethers
For broader 360 virtual-tour camera/lens context, see this overview: DSLR and mirrorless 360/virtual tour lens guide. Disclaimer: software/hardware names provided for search reference; check official sites for details.
Common Mistakes & How to Avoid Them
- Parallax error: Use a calibrated panoramic head with the entrance pupil over the pivot. Don’t rely on handheld for critical interiors.
- Exposure or color flicker: Shoot in full manual and lock white balance; don’t use auto ISO or auto WB across frames.
- Tripod in shot: Capture a clean nadir patch and use viewpoint correction or cloning in post.
- Ghosting from moving subjects: Take multiple passes and use stitcher masking to select the clean frame per region.
- Night noise: Keep ISO low on tripod. Let shutter time increase; Z7 II’s base ISO files grade beautifully.
- Flare with fisheye: Shade the lens with your body where possible, and shoot an extra frame to mask in a cleaner region if the sun causes a flare ray.
Frequently Asked Questions
- Can I shoot handheld panoramas with the Nikon Z7 II?
Yes, for quick outdoor scenes you can do 4-around handheld with the Sigma 8mm. Use high shutter speeds (1/250+), fixed exposure/WB, and overlap generously (40%). Expect more stitching corrections compared to tripod work; avoid handheld indoors where near objects increase parallax.
- Is the Sigma 8mm f/3.5 Circular Fisheye wide enough for single-row 360?
Yes. On full-frame it covers 180° in all directions. Practical sets are 3-around + zenith + nadir, or 4-around slightly tilted up + nadir. The 4-around method improves reliability, especially on poles or with nearby objects.
- Do I need HDR for interiors with bright windows?
Usually. The Z7 II has excellent DR at ISO 64, but windows often require ±2 EV bracketing to retain exterior detail without crushing interiors. Merge the brackets per yaw angle before stitching, or use PTGui’s built-in HDR merge.
- How do I avoid parallax issues with this combo?
Mount the Z7 II + FTZ + Sigma on a panoramic head and position the entrance pupil over the rotation axis. Start around 5.8–6.2 cm from the sensor plane (verify on your rail). Test with a near and far vertical edge while yawing; when they stay aligned, you’ve found the correct setting.
- What ISO range is safe on the Z7 II in low light?
On tripod, favor ISO 64–200 and extend shutter time. For handheld or crowds, ISO 400–800 is a solid compromise. ISO 1600 is still usable but expect reduced highlight headroom and more visible noise in deep shadows.
- Can I set custom modes for faster pano shooting?
Yes. Use U1/U2/U3 to store “Tripod Pano” settings (M mode, ISO 64, f/8, fixed WB, IBIS off, EFCS on) and a “Handheld Pano” preset (M mode, 1/250 s, f/5.6–f/8, ISO 400–800, IBIS on). This makes setup repeatable on location.
- How do I reduce flare with a circular fisheye?
Avoid direct light sources on the frame edge. Slightly change yaw so the sun lands in an area you can patch. Use your body or a flag to shade the lens, and shoot an extra “clean sky” frame for masking.
- What’s the best tripod head for this setup?
A compact, two-axis panoramic head with fore–aft and left–right rail adjustment (e.g., Nodal Ninja or Leofoto) is ideal. It should allow precise yaw clicks (e.g., 90°, 60°, 45°) and fine fore–aft adjustments to nail the entrance pupil for the Sigma 8mm.
Safety, Limitations & Trustworthy Practices
Fisheyes are sensitive to flare and show dust or fingerprints readily—clean often. The Sigma 8mm’s extreme FOV also captures more tripod/pano head hardware; plan a proper nadir patch. On rooftops and poles, always tether gear and monitor winds; the circular fisheye’s bulbous front element needs a cap between sets to prevent accidental damage. For data safety, back up cards after each location; the Z7 II’s dual slots let you write RAW+RAW or RAW+JPEG simultaneously as an immediate redundancy. Keep a simple written log of rail settings (entrance pupil) and exposure choices—repeatability builds reliability.
Behind the Scenes

Wrap-up
With the Nikon Z7 II’s high-resolution sensor and the Sigma 8mm circular fisheye’s massive coverage, you can create fast, reliable 360° panoramas with minimal frames. Prioritize solid nodal alignment, fixed exposure and WB, and disciplined overlap. For deeper technique on mounting and alignment, see this panoramic head tutorial: Detailed panoramic head setup. With careful planning and clean post, you’ll produce professional panoramas ready for VR, virtual tours, and large-format prints.
